配置组与另类写法示例
ver.20210818(此为过时旧版,前往首页查看新版)
序
阅读本章前默认已基本熟悉 mpv.conf 内各参数用途及含义
mpv.com 文件是MPV播放器的CLI(命令行界面)程序
这里有另一种思路下 mpv.conf 的写法与更多条件配置示例(conditional auto profiles)
起
mpv.conf 里的参数分为通用参数和配置参数。通用参数在你打开MPV空窗口的同时就已经加载了,而配置参数正常情况下不会加载。
你所见到的 [xxxxx] 这样的文本就是一个配置参数的头部标志,在首个未被注释掉的配置 [xxxxx] 所在行之前的参数都是通用参数,在两个配置 [profile-x] 和 [profile-y] 所在行之间的参数都属于 [profile-x] ,这些特性也决定了通用参数只能写在最前面。
配置参数又分为常规配置和条件配置。先讲解一下常规配置,它不会自动触发,下面导入实际例子。
基本操作
很多人的 mpv.conf 里都有一条高频的通用参数 --profile=gpu-hq ,它其实就是一套预设参数组的集合。MPV其实预设了不止一套参数组,你可以通过在 mpv.com 文件所在目录打开 PowerShell (空白处 按住Shift+单机鼠标右键)执行 ./mpv --profile=help 得到所有可用的(常规+条件)配置:
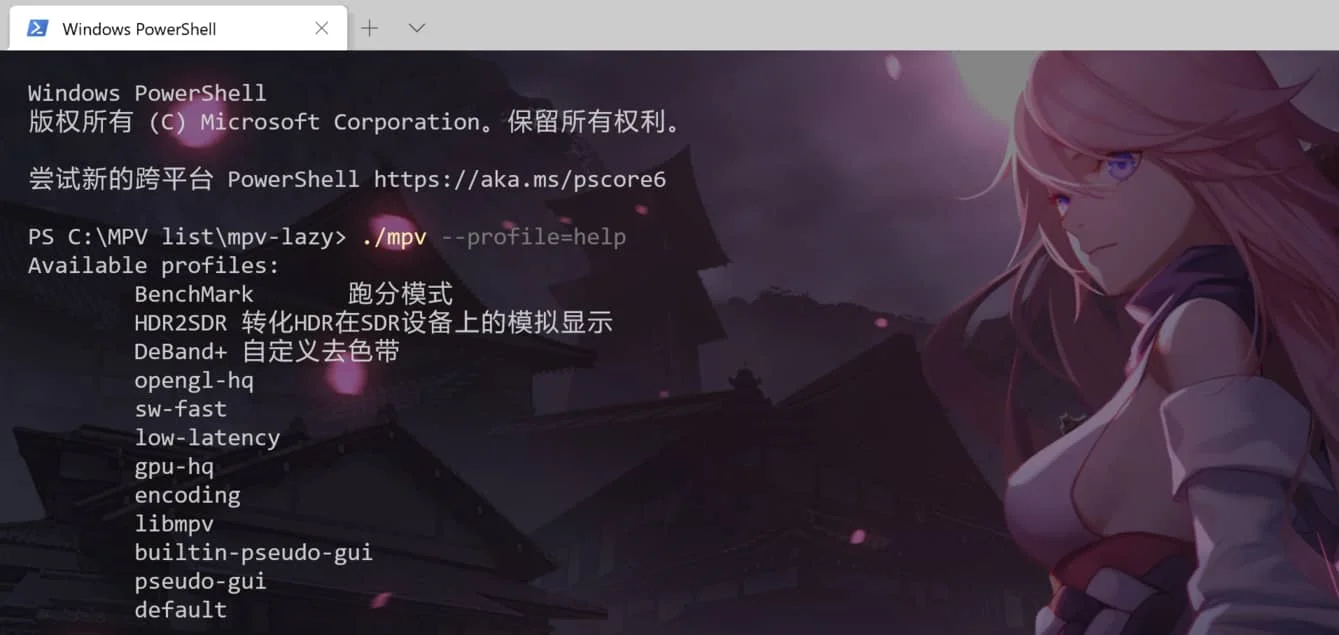
xxxxxxxxxx121#上图例为懒人包v20210210的所有可用配置,代码块展示的是0.33原版的2PS C:\MPV list\mpv-stable> ./mpv --profile=help3Available profiles:4 opengl-hq5 sw-fast6 low-latency7 gpu-hq8 encoding9 libmpv10 builtin-pseudo-gui11 pseudo-gui12 default同样的位置, PowerShell 执行 ./mpv --show-profile=配置名 查看某个配置的实际内容:
xxxxxxxxxx101PS C:\MPV list\mpv-stable> ./mpv --show-profile=gpu-hq2Profile gpu-hq:3 scale=spline364 cscale=spline365 dscale=mitchell6 dither-depth=auto7 correct-downscaling=yes8 linear-downscaling=yes9 sigmoid-upscaling=yes10 deband=yes所以你在 mpv.conf 中某行写入 --profile=gpu-hq 时实际等效在该位置按顺序写入以上八项实际参数。
顺序逻辑
① 通用参数:执行逻辑是从上到下依次读取。
假如你想在 mpv.conf 中启用 --profile=gpu-hq 的同时关闭 --deband ,却这样写:
xxxxxxxxxx21deband=no2profile=gpu-hq 只会得到相反的结果:MPV先关闭了去色带,再读取 [gpu-hq] 后又打开了去色带功能。正确写法是调换这两行参数的位置。(当然你也可以再往后额外加一行 --deband=no ,但是正常人应该不会这么做)
② 配置参数:虽然,实际运行时条件配置的先后触发顺序文档中没有记录(根据观察是相对固定的),但是,常规配置和条件配置参数在 mpv.conf 中没有书写顺序的要求。
创造 检验 运用
建议用无脚本和插件的MPV做测试 https://sourceforge.net/projects/mpv-player-windows/files/64bit/
创建自己的配置名称不要与已有的重名(我没有测试过后果)
在了解基本逻辑之后可以进行创建自己的配置参数
① 先从常规配置起步 尝试在空白的 mpv.conf 中创造一个简单的常规配置:
xxxxxxxxxx61[JBLp] # 配置名。支持中文2profile-desc=叽叽哔哔循环 # [多余参数] 配置描述,支持中文,随意填写3video-sync=audio # 自定义参数14loop-file=inf # 自定义参数25audio-pitch-correction=no # 自定义参数36speed=2 # ......保存之后退出,检验: 法(1) 打开MPV空窗口,`键 调出控制台(控制台模式下屏蔽绝大多数快捷键,按Esc关闭)
输入 apply-profile JBLp 执行(回车键)。正常情况是控制台不会有信息显示,此时一次性拖入任意数量的视频,符合预期的表现是当前文件二倍速播放+音调变高+无限单曲循环。
法(2)
mpv.conf 内最上方加入通用参数 --profile=JBLp ,即整体修改成如下样式。
xxxxxxxxxx41profile=JBLp2
3[JBLp]4之后打开MPV空窗口,一次性拖入任意数量的视频,检查实际表现。
▲ 当然,此时你也可以通过前面的基本操作,可以发现 PowerShell 执行对应命令产生的列表中出现了自己刚写的这个配置 JBLp 。如果你填写了 --profile-desc=<value> ,那么这项值也会显示(见最上方图)
② 进阶尝试一个典型的条件配置 在之前的 mpv.conf 中继续修改,以很常见的需求——1080p的视频制定单独方案来举例:
xxxxxxxxxx121
3[JBLp]4
6[1080p] # (同前)7profile-desc=全高清方案 # (同前)8profile-cond=height==1080 and width==1920 # [必要参数] 用于判定满足该条件时自动执行该套参数组9profile-restore=copy # [选用参数] 备份执行该配置前的所有参数,用于恢复10cscale=jinc11scale=jinc12dscale=jinc 保存之后退出,按设定的条件进行检验:先打开MPV空窗口,调出控制台, --profile-cond 的值如果有书写错误会有类似 [auto_profiles] Profile '1080p' condition: 的红色文本报错信息,无错再进行下一步。一次性拖入1080p和720p的两个视频,当播放1080p视频时控制台自动弹出文本 [auto_profiles] Applying auto profile: 1080p ,当切换到720p视频时控制台显示 [auto_profiles] Restoring profile: 1080p
 你也可以同时查看内置的 stats.lua 统计信息(Shift+i)的第二页共同检验jinc算法的切换是否正常。
▲ 不写或注释掉选用参数 #profile-restore=copy 后,MPV在满足该配置的触发条件后彻底覆盖原参数。该行为类似于自动在控制台输入 apply-profile 1080p
▲ --profile-cond 可以用通用参数作为判定条件,也可以用 https://mpv.io/manual/master/#property-list 里的属性。这些属性需要用引号和中括号规范,单等于号不可用, and or not 分别表示 和 或 非 ,详细示例见后文。
后
可能的风险
条件配置的最大局限在于,它并不是直接的开关on/off的关系,自动触发某条件配置后,你在这期间手动激活的其它参数,有可能会随着撤回该条件配置的同时一起被移除,可以通过以下的示例轻松复现问题:
新建空白 input.conf 中写入:
xxxxxxxxxx11CTRL+v vf add deblock=filter=weak:block=4 # 去色块滤镜清空 mpv.conf 中写入:
xxxxxxxxxx51[N-fs-r]2 profile-desc=非全屏状态时画面顺时针转90°3 profile-cond=not fullscreen4 profile-restore=copy5 vf-add=rotate=90*PI/180然后打开MPV空窗口,拖入一个视频,已触发条件配置 N-fs-r ,再手动 Ctrl+v 激活去色块滤镜,观察统计信息的滤镜列表:
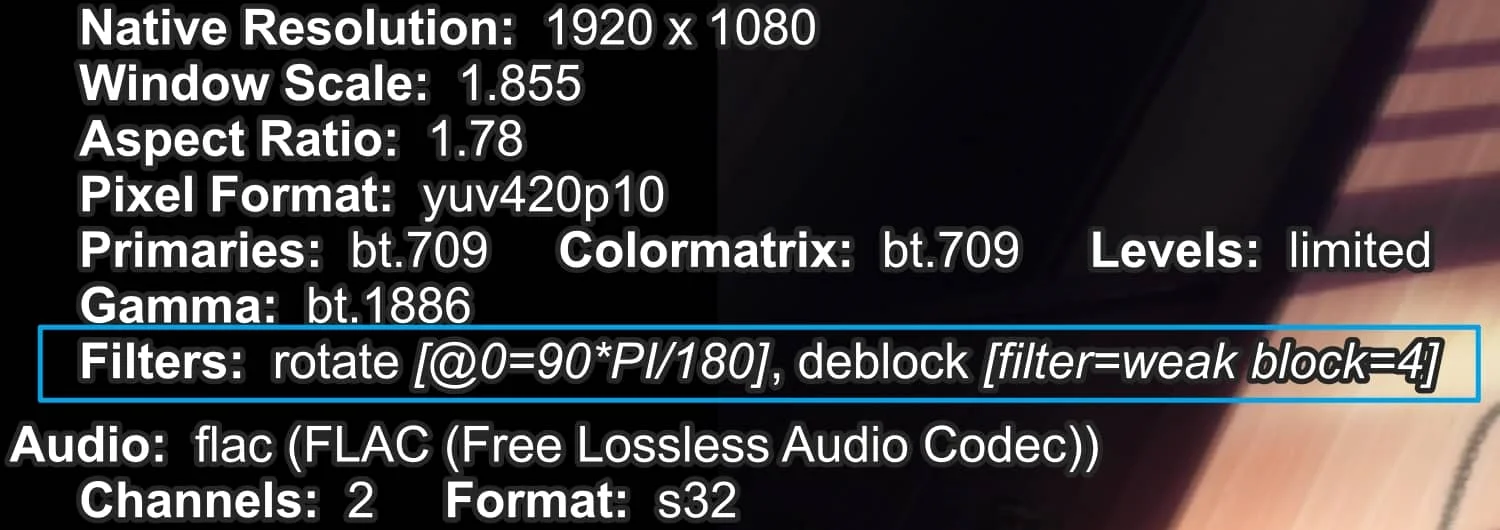 进入全屏,假想情况是只撤销 rotate 旋转滤镜,实际是所有视频滤镜都消失了
存在的一个不完美的解决方案是改为非典型条件配置并创建对应的反配置:
xxxxxxxxxx101[N-fs-r]2 profile-desc=非全屏状态时画面顺时针转90°3 profile-cond=not fullscreen4 vf-add=rotate=90*PI/1806
7[N-fs-r_Alt] # 反配置没有名称格式要求,随意写8 profile-desc=N-fs-r的反配置9 profile-cond=fullscreen # not “非”的对应10 vf-remove=rotate=90*PI/180 # 改为 --vf-add 的对应行为参数再次检验,实际情况符合预期。
配置规范化
通用参数和常规配置可以设计的很复杂,但条件配置应尽量简化以避免实际运行时可能造成的混乱。 在MPV更改目前这个条件配置的机制之前,只有通过相对规范的配置来避免切换中可能存在的问题。虽然配置可以相互套娃,但是最好不要这么做。
一个简单合理的 mpv.conf 示范:
xxxxxxxxxx411profile=gpu-hq2
3[SD]4profile-restore=copy5profile-cond=width==720 and (height==576 or height==480)6scale=ewa_lanczossharp7cscale=bilinear8dscale=ewa_lanczos9linear-downscaling=yes10deband=yes11glsl-shaders="~~/shaders/KrigBilateral.glsl;~~/shaders/ravu-zoom-r4.glsl"12
13[HD]14profile-restore=copy15profile-cond=width==1280 and width==72016scale=ewa_lanczossharp17cscale=bilinear18dscale=ewa_lanczos19linear-downscaling=yes20deband=yes21glsl-shaders="~~/shaders/KrigBilateral.glsl;~~/shaders/FSRCNNX_x2_16-0-4-1.glsl"22
23[FHD&2K]24profile-restore=copy25profile-cond=(width==1920 or width==2560) and (height==1080 or height==1440)26scale=spline1627cscale=spline6428dscale=catmull_rom29linear-downscaling=yes30deband=yes31glsl-shaders="~~/shaders/Anime4K_Upscale_CNN_L_x2.glsl"32
33[UHD]34profile-restore=copy35profile-cond=width>=3840 or height>=216036scale=bilinear37cscale=bilinear38dscale=mitchell39linear-downscaling=no40deband=no41glsl-shaders="~~/shaders/SSimDownscaler.glsl"
现实情况中设置多重且复杂的条件配置会导致一个播放视频同时调用多个配置,切换下一个视频时只撤销部分配置又拉起新的配置,暂无验证是否在这种情况下产生异常情况,因此示范偏保守只选择分辨率作为变量设置不同组。
mpv.conf 的特殊技巧
以下是一份完整的非一般的 mpv.conf 写法,同时运用了上文所叙述的内容。
将所有参数组合配置化(profile),通用区只用单一类参数 --profile=<value> 进行自由灵活搭配,通过组合调用后实际构成一套完整的通用参数。
条件配置主要的是提供范例便于萌新依葫芦画瓢,和其上方的参数一起使用可能存在逻辑上的bug(写的时候没有考虑实际使用)
##== 通用参数区 ==##
xxxxxxxxxx141#profile=profile-1,profile-2,profile-32##这是 --profile=<value> 的官方推荐写法,执行顺序从左到右,但不易读和修改,因此换用下面的写法,执行顺序从上到下3
4profile=Base-15profile=A-26profile=V-07#profile=Icc-18#profile=Deband-19profile=Smooth-210profile=Sub-211profile=Screenshot-312
13#profile=BenchMark # 此配置应单独使用14#log-file="~~desktop/mpv-test.log"
##== 常规配置区 ==##
xxxxxxxxxx1471#[示例常规配置]         # 配置名。支持中文2#profile-desc=这是举例 # [多余]配置描述,支持中文,随意填写3#                     # 自定义参数14#                     # 自定义参数25#                     # ......6
7[Base-1]8vo=gpu9gpu-api=d3d1110hwdec=d3d11va-copy11hidpi-window-scale=no12keep-open=yes13hr-seek-framedrop=no14save-position-on-quit=no15gpu-shader-cache-dir="~~/shaders_cache"16
17[Base-2]18vo=gpu19gpu-api=vulkan20hwdec=no21keep-open=yes22
23[A-1]24audio-file-auto=fuzzy25volume-max=10026audio-pitch-correction=yes27af=scaletempo228
29[A-2]30audio-file-auto=fuzzy31volume-max=13032audio-pitch-correction=yes33af=rubberband34
35[V-0]36scale=bilinear37cscale=bilinear38dscale=bilinear39
40[V-1]41scale=ewa_lanczossharp42cscale=spline3643dscale=mitchell44dither-depth=auto45correct-downscaling46linear-downscaling47sigmoid-upscaling48
49[V-2]50glsl-shaders="~~/shaders/ravu-zoom-r4-chroma.glsl;~~/shaders/ravu-zoom-r4.glsl"51
52[Icc-0]53target-prim=dci-p354target-trc=gamma2.255
56[Icc-1]57icc-profile-auto58#icc-3dlut-size=256x256x25659icc-cache-dir="~~/icc_cache"60#vf=format:gamma=gamma2.261
62[Deband-1]63deband64deband-iterations=265deband-threshold=3266deband-range=1467deband-grain=1268
69[Smooth-1]70video-sync=display-resample71video-sync-max-video-change=572interpolation73tscale=oversample74
75[Smooth-2]76video-sync=display-resample77video-sync-max-video-change=578interpolation79tscale=box80tscale-window=sphinx81tscale-radius=1.0182tscale-clamp=0.083
84[Sub-1]85sub-auto=fuzzy86slang=chs,sc,zh,chi,zho87blend-subtitles=video88sub-use-margins=no89sub-font='YouYuan'90
91[Sub-2]92sub-auto=fuzzy93slang=chs,sc,zh,chi,zho94sub-ass-force-margins=yes95sub-font='YouYuan'96
97[Screenshot-1]98screenshot-format=jpg99screenshot-jpeg-quality=100100#screenshot-jpeg-source-chroma=yes101screenshot-tag-colorspace=yes102#screenshot-high-bit-depth=yes103screenshot-template=MPV-%P-N%n104screenshot-directory=~~desktop/105
106[Screenshot-2]107screenshot-format=png108screenshot-png-compression=5109#screenshot-png-filter=5110screenshot-tag-colorspace=yes111#screenshot-high-bit-depth=yes112screenshot-template=MPV-%P-N%n113screenshot-directory=~~desktop/114
115[Screenshot-3]116screenshot-format=webp117screenshot-webp-lossless=yes118#screenshot-webp-quality=100119screenshot-webp-compression=3120screenshot-tag-colorspace=yes121#screenshot-high-bit-depth=yes122screenshot-template=MPV-%P-N%n123screenshot-directory=~~desktop/124
125
126[BenchMark]127##此配置应单独使用128window-scale=0.5129#vo=gpu130#gpu-api=vulkan131#hwdec=d3d11va132sub=no133audio=no134#untimed=yes135keep-open=always136video-sync=display-desync137interpolation=no138vulkan-swap-mode=immediate139opengl-swapinterval=0140d3d11-sync-interval=0141osd-msg1="FPS: ${estimated-display-fps}"142scale=jinc143cscale=jinc144dscale=jinc145vf=""146glsl-shaders=""147log-file="~~desktop/mpv-BenchMark.log"
##== 条件配置区 ==##
##下方的可交叉条件显然涉及前文提到的风险,但是重点是列举一些例子以供萌新依葫芦画瓢。
xxxxxxxxxx701#[示例条件配置]         # 配置名。支持中文2#profile-desc=这是举例 # [多余] 配置描述,支持中文,随意填写3#profile-restore=copy # [可选] 此参数一般用于回归触发前的通用参数(关闭此项将保留该配置参数并覆盖通用参数)4#profile-cond=???     # [必要] 触发该配置的条件。可用的属性列表:https://mpv.io/manual/master/#property-list5#                     # 自定义参数16#                     # 自定义参数27#                     # ......8
9[N-fs-p]10profile-desc=切换到非全屏状态时暂停11profile-restore=copy12profile-cond=not fullscreen13pause14
15[Short-loop]16profile-desc=短时长文件自动循环播放17profile-restore=copy18profile-cond=duration<=15019loop-file=inf20
21[Deband-0]22profile-desc=YUV420P10及以上的源关闭去色带23profile-restore=copy24profile-cond=p["video-params/average-bpp"]>=2425deband=no26
27[HDR2SDR]28profile-desc=高转标准动态范围29profile-restore=copy30profile-cond=p["video-params/primaries"]=="bt.2020"31blend-subtitles=no32#tone-mapping=bt.239033hdr-compute-peak=yes34cscale=bilinear35scale=bilinear36dscale=bilinear37deband=no38vf=""39glsl-shaders=""40
41[SD-ex]42profile-desc=低清源增强43profile-restore=copy44profile-cond=height<720 and width<128045deband46deband-iterations=347deband-threshold=4848deband-range=1249deband-grain=050glsl-shaders="~~/shaders/KrigBilateral.glsl;~~/shaders/noise_static_chroma.glsl;~~/shaders/noise_static_luma.glsl;~~/shaders/nnedi3-nns64-win8x4.glsl"51
52[HD++]53profile-desc=高清源选项54profile-restore=copy55profile-cond=(height>=720 or height<1080) and (width>=1280 or width<1920)56cscale=sinc57cscale-window=blackman58cscale-radius=359glsl-shaders="~~/shaders/FSRCNNX_x2_8-0-4-1.glsl"60
61[2K++]62profile-desc=超清源选项63profile-restore=copy64profile-cond=height>1440 and width>256065cscale=catmull_rom66scale=spline3667dscale=mitchell68linear-downscaling=no69glsl-shaders="~~/shaders/SSimDownscaler.glsl"70deband=no参数分离
相比上方的野路子,这个操作很正经。(这也是20210617之后的懒人包版本所采用的方案)
mpv.conf 中的任意位置皆可,写入
include = "~~/xxxxx.conf"
然后mpv.conf的同目录建立这个同名文件
该参数用于在主设置文件后追加读取的设置文件,这样主设置文件只写通用参数,追加的只写配置组。